Diagenode

Guide for optimal chromatin preparation using Chromatin EasyShear Kits

Chromatin immunoprecipitation (ChIP) is a common tool used to study protein-DNA interactions in cells and tissues. The assay can be cumbersome and the success is highly dependent on the quality of chromatin. The first critical step of a successful ChIP experiment is the preparation of sheared chromatin which is representative of the biological scenario of interest. In the below paragraph we discuss the most critical parameters of the optimal chromatin sample preparation.

A high quality chromatin sample combines two main features:

  • a suitable fragment size range and
  • the availability of cross-linked epitopes for ChIP

A perfect sonication profile is a profile in which the highest specific signal and the lowest background are generated.

There is no one universal size range generally applicable for ChIP. As a rule, fragments between 100-600 bp are suitable for the majority of ChIP experiments and can be used as a starting point. This range can be fine-tuned for particular experimental requirements depending on the specificity of the target (histones or non-histone proteins) and the required down-stream analysis (ChIP-qPCR or ChIP-seq). Generally, a tighter fragment distribution is recommended for ChIP-seq than for ChIP-qPCR. Note that 100-300 bp is compatible (but not absolutely necessary) with histone ChIP-seq while a broader fragment range is more suitable for non-histone ChIP-seq (transcription factors and proteins that are not bound directly to DNA and for long-distance interacting proteins). With the recent evolution of sequencing technologies it is common to perform ChIP-seq experiments from chromatin with a distribution in the 100–800 bp range.

A successful chromatin preparation relies on the optimization of cross-linking, cells lysis and sonication itself. All 3 steps are interconnected and need to be optimized individually for different experimental settings. Therefore, the following parameters should be considered:

  • Cross-linking

    Cross-linking is typically achieved by using formaldehyde which forms reversible DNA-protein links. Formaldehyde rapidly permeates the cell membranes and enables a fast cross-linking of closely associated proteins in intact cells. Formaldehyde cross-linking is ideal for two molecules which interact directly. However, for higher order and/or dynamic interactions, other cross-linkers should be considered for efficient protein-protein stabilization such as Diagenode ChIP Cross-link Gold, an innovative dual cross-linking ChIP fixation reagent (Cat. No. C01019021).

    Adopt the fixation strategy that is best suited to studying your particular proteins. Some epigenetic marks may be more elusive than others. When studying weak or rare protein-DNA binding events fixation should be done promptly and directly in medium. When studying histone marks, cells can be put in suspension by trypsinization before fixation. Generally, a shorter fixation is required for histones marks (8-10 min) than for transcriptional factors (10-20 min) using a standard formaldehyde single step fixation protocol.

    Use fresh formaldehyde. The use of high quality and fresh formaldehyde is crucial while using methanol-free reagent is not mandatory. Replace your stock every month. This will ensure high inter-assay reproducibility between ChIP experiments.

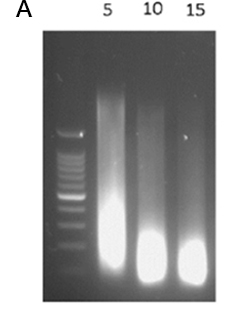
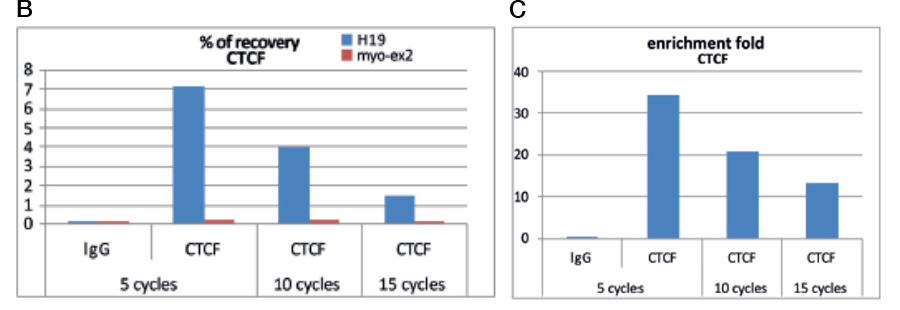
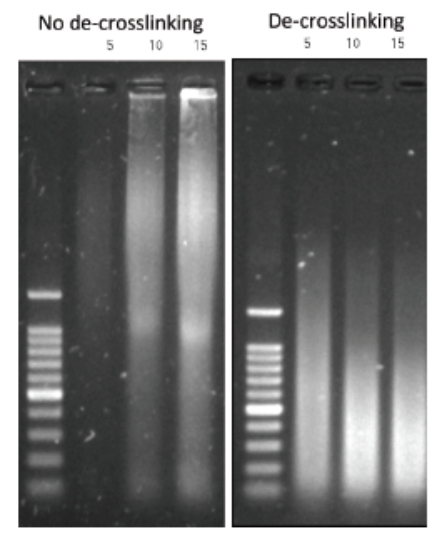
    Always carry out a fixation time course for your cell line to empirically determine the optimal fixation time for your cell line and epitope of interest. Cell lines and epitopes differ widely in their fixation efficiency and sensitivity to fixation.

    Be precise with the fixation time and temperature. The formaldehyde fixation is a time and temperature–depending process. A stronger cross-linking will be achieved at a higher temperature and at longer duration. Whether you use RT or 37°C, 5 or 15 min (depending on your specific target and cell types), make sure that the temperature and time are consistent.

  • Lysis strategy

    The lysis step is required to liberate cellular components by dissolving the cell membrane with detergent based solutions and to extract the crosslinked protein-DNA complexes from cells or tissue into solution. Sonication is required to complete the cell lysis. Generally, the stronger the fixation, the harsher the conditions that should be used for cell lysis and sonication.

    It is possible to use a one-step lysis to lyse cells directly with an SDS-containing buffer or a two-step lysis to isolate nuclei using a buffer with non-ionic detergents in which cellular membranes are first lysed followed by treatment of the isolated nuclei with an SDS-containing buffer. Two-step lysis allows the removal of most of the soluble cytosolic proteins. This can improve the sonication efficiency as well reduce background and increase sensitivity of the ChIP assay.

    One-step lysis is most appropriate when starting with a limited number of cells (read more about Chromatin EasyShear Kit – High SDS) while two-step lysis with nuclei isolation is preferable when working with a high number of cells (Chromatin EasyShear Kit – Ultra Low SDS, Low SDS and for Plant), strongly fixed cells and “difficult” cells.

  • Shearing optimization

    The length of sonication time depends on many factors (cell type, cell density, sample volume, fixation time). Hence it is important to optimize the sonication conditions for each new ChIP project.

    The protocol is used in a combination with the Bioruptor (Pico or Plus). Perform an initial sonication time course experiment to evaluate the extent of chromatin fragmentation.

    Choose the protocol which is adapted to your device:

    • When using the Bioruptor Pico, an initial time-course experiment of 5-10-12 sonication cycles 30’’ ON/30’’ OFF is recommended
    • When using the Bioruptor Plus, an initial time-course experiment of 10-20-30 sonication cycles [30 seconds “ON”, 30 seconds “OFF”] at High power is recommended

    During the sonication, the mean size of DNA fragments will decline progressively approaching a lower limit of 100-150 bp (mean size of the smear). It is recommended to choose a sonication time before reaching this lower limit. As best practice, choose the shortest sonication time resulting in a satisfactory shearing and ChIP efficiency (highest recovery/lowest background). Avoid over-sonication, as it may lead to a drop of efficiency in ChIP experiments, especially when non-histones proteins are to be evaluated by ChIP (Figure 1).

    Figure 1. Optimal chromatin shearing profile.
    HeLa cells were fixed with formaldehyde for 10 min and chromatin was prepared according to Diagenode’s Chromatin EasyShear Kit - Low SDS (Cat. No. C01020013). Samples were sonicated for 5-10-15 cycles of 30” ON/30” OFF as indicated with Bioruptor Pico using 1.5 ml Bioruptor microtubes with caps (Cat. No. C30010016) followed by de-crosslinking and DNA purification. The fragment size was assessed using agarose gel electrophoresis. A 100 bp ladder was loaded as the size standard (panel A).
    Sheared chromatin has been used for immunoprecipitation with CTCF and IgG (negative control) antibodies. Quantitative PCR was performed with positive (H19) and negative (Myoglobine exon 2) control regions. The Figure 1 shows the recovery expressed as % of input (the relative amount of immunoprecipitated DNA compared to input DNA (panel B) and as enrichment fold of positive locus over negative (panel C).

    Analysis of the results from Figure 1.
    Fragments suitable for ChIP experiments with transcriptional factors are generated after 5 cycles (panel A). The fragment size distribution from 100-600 bp is compatible with requirements for all ChIP-seq experiments together with the best enrichment obtained for transcriptional factor (CTCF) (panel B and C).
    Chromatin sheared for 10 cycles (100 - 300 bp, panel A) is suboptimal for ChIP-seq for transcriptional factors due to a drop of ChIP efficiency (panel B and C).
    Chromatin after 15 cycles with fragment size distribution of 100 - 200 bp might be over-sheared: while fragment size is suitable for ChIP-seq experiment (100 - 200 bp, panel A), a significant drop of ChIP efficiency is observed for CTCF (panel B and C).

    In some situation, it is preferable to re-shear the purified de-crosslinked DNA after immunoprecipitation rather than over-sonicate. Re-shearing enables the enrichment of fragments in the desired optimal size range suitable for next-generation sequencing. Please refer to the following protocol: Re-shearing of decrosslinked immunoprecipitated DNA using the Bioruptor® Pico

    Ensure that only the recommended tubes are used for sonication. Please refer to the following guide. It is important to note that sonication tubes recommended for the Bioruptor Pico are different from the tubes recommended for the Bioruptor Plus. Using the wrong tubes will lead to inefficient shearing.

    Be aware that sonication efficiency may differ depending on a type of tubes used. Switching to another type of tubes (e.g. from 1.5 ml to 15 ml tubes) will require an additional optimization. Ensure that the sample volume per sonication is in the recommended range. Any deviations from this recommended range will lead to inefficient shearing and lack of reproducibility.

  • Chromatin shearing assessment

    For accurate size determination of the chromatin fragments, reverse crosslinking, including RNase treatment followed by DNA purification, is advised. Size estimation of chromatin fragments without reverse cross-linking is not precise. The presence of the crosslinks retards electrophoretic migration resulting in a misinterpretation of fragment size.

    Figure 2. Reversing crosslinks is necessary for accurate size estimation.
    HeLa cells were fixed with formaldehyde and chromatin was prepared accordingly to Diagenode’s Chromatin Shearing Optimization Kit – Medium SDS (Cat. No. C01020011). Samples were sonicated for 5, 10 and 15 cycles of 30” ON/30” OFF as indicated with the Bioruptor Pico using 1.5 ml Bioruptor microtubes with caps (Cat. No. C30010016). A 100 bp ladder was loaded as size standard. Left panel: non de-crosslinked chromatin. Right panel: de-crosslinked chromatin.

    RNase treatment significantly reduces background caused by degraded RNA and improves visual assessment of shearing. The presence of degraded RNA in the sample might lead to mis-interpretation of the shearing. Smear below 100 bp is due to degraded RNA but not over-sheared DNA.

    Figure 3. RNase treatment significantly reduces background caused by degraded RNA and improves visual assessment of shearing.
    Chromatin from HeLa cells was prepared according to Diagenode’s protocol. Samples were sonicated for 5 cycles of 30” ON/30” OFF with Bioruptor Pico using 1.5 ml Bioruptor microtubes with caps (Cat. No. C30010016) followed by de-crosslinking and DNA purification in the presence or absence of RNase as indicated. The fragment size was assessed using agarose gel electrophoresis. A 100 bp ladder was loaded as the size standard.

    This protocol is compatible with different DNA purification methods:

    • magnetic beads purification (e.g. IPure beads from Diagenode, Cat. No. C03010014)
    • a columns-based DNA clean-up (e.g. MicroChIP DiaPure columns from Diagenode, Cat. No. C03040001)
    • or a conventional phenol-chloroform extraction

    Please note that reagents for DNA purification are not included in the kit and should be provided by user.

    DNA derived from FFPE samples should be purified using MicroChIP DiaPure columns. Eluted DNA is enough concentrated to be analysed using the Fragment Analyzer (Agilent) and High Sensitivity NGS Fragment Analysis Kit (Agilent, DNF-473). The agarose gel is not sensitive enough to visualize the low amount of DNA obtained from FFPE samples.

    For the size assessment of sheared chromatin we recommend using an agarose gel analysis or the Fragment Analyzer (Agilent).

    If using an agarose gel, the sheared chromatin should be analyzed on a 1.2 - 1.8% agarose gel. The optimal DNA amount from sheared chromatin is around 300 ng per lane. A serial dilution from 100 ng to 500 ng could be run. Do not overload the gel as the migration of large quantities of chromatin on an agarose gel can lead to poor quality pictures which do not reflect the real DNA fragmentation. The minimum amount of sheared chromatin that can be visualized in an agarose gel corresponds to 60,000 cells equivalent. Both the pre- and post-staining of the agarose gel with ethidium bromide or SybrSafe dye can be used for visualization of sheared fragments. Some slight differences might be observed between post- and pre-stained gels. Post-staining eliminates any possibility that the dye interferes with the migration and ensures an even background noise. However, pictures are usually less clear and bright with some background noise. If pre-stained agarose gels are used, it is advised that the electrophoresis buffer contains the stain in the same concentration as in the gel. If the stain is present in the gel but not in the buffer, the gel will result in uneven staining because the free dye migrates towards the top of the gel leaving the bottom part with no stain. Therefore, the background noise becomes non-uniform.

    Using Fragment Analyzer (Agilent), please follow the manufacturer’s instruction.

    If using the Agilent BioAnalyzer, please keep in mind that traces are log-based, so a large distribution of higher molecular weight fragments are compacted into a much smaller area of the trace as compared to the smaller size fragments leading to a visual misinterpretation of fragment distribution.

    Figure 4. An appropriate method should be used for the shearing assessment
    HeLa cells were fixed with formaldehyde for 8 min and chromatin was prepared according to Diagenode’s Chromatin EasyShear Kit - Ultra Low SDS (Cat. No. C01020010). Samples were sonicated for 10 cycles of 30” ON/30” OFF with Bioruptor Pico using 1.5 ml Bioruptor microtubes with caps (Cat. No. C30010016) followed by de-crosslinking and DNA purification. The fragment size was assessed using Fragment Analyzer (left) and BioAnalyzer (right). The BioAnalyzer trace is biased towards the high-molecular- weight fragments.

    If high molecular weight fragments are present, it is recommended estimating a molar ratio between fragments in a desired range and higher molecular weight fraction. The molarity allows estimating a number of molecules in a particular range. The presence of high molecular weight fragments up to 15% - 20% (molar ratio) is acceptable (Figure 5).

    Figure 5. A molar ratio between desired fragments range and high molecular weight fraction should be estimated.
    HeLa cells were fixed with formaldehyde for 10 min and chromatin was prepared according to Diagenode’s Chromatin EasyShear Kit - Low SDS (Cat. No. C01020013). Samples were sonicated for 12 cycles of 30” ON/30” OFF with Bioruptor® Pico using 1.5 ml Bioruptor microtubes with caps (Cat. No. C30010016) followed by de- crosslinking and DNA purification. The fragment size was assessed using Fragment Analyzer. The molar content of fragments in the range 100-500 bp and 500-5.000 bp was estimated showing that large fragment do not exceed 15%.

Events

  • AACR 2024
    San Diego, California, USA
    Apr 5-Apr 10, 2024
 See all events

News

 See all news


The European Regional Development Fund and Wallonia are investing in your future.

Extension of industrial buildings and new laboratories.


       Site map   |   Contact us   |   Conditions of sales   |   Conditions of purchase   |   Privacy policy   |   Diagenode Diagnostics